
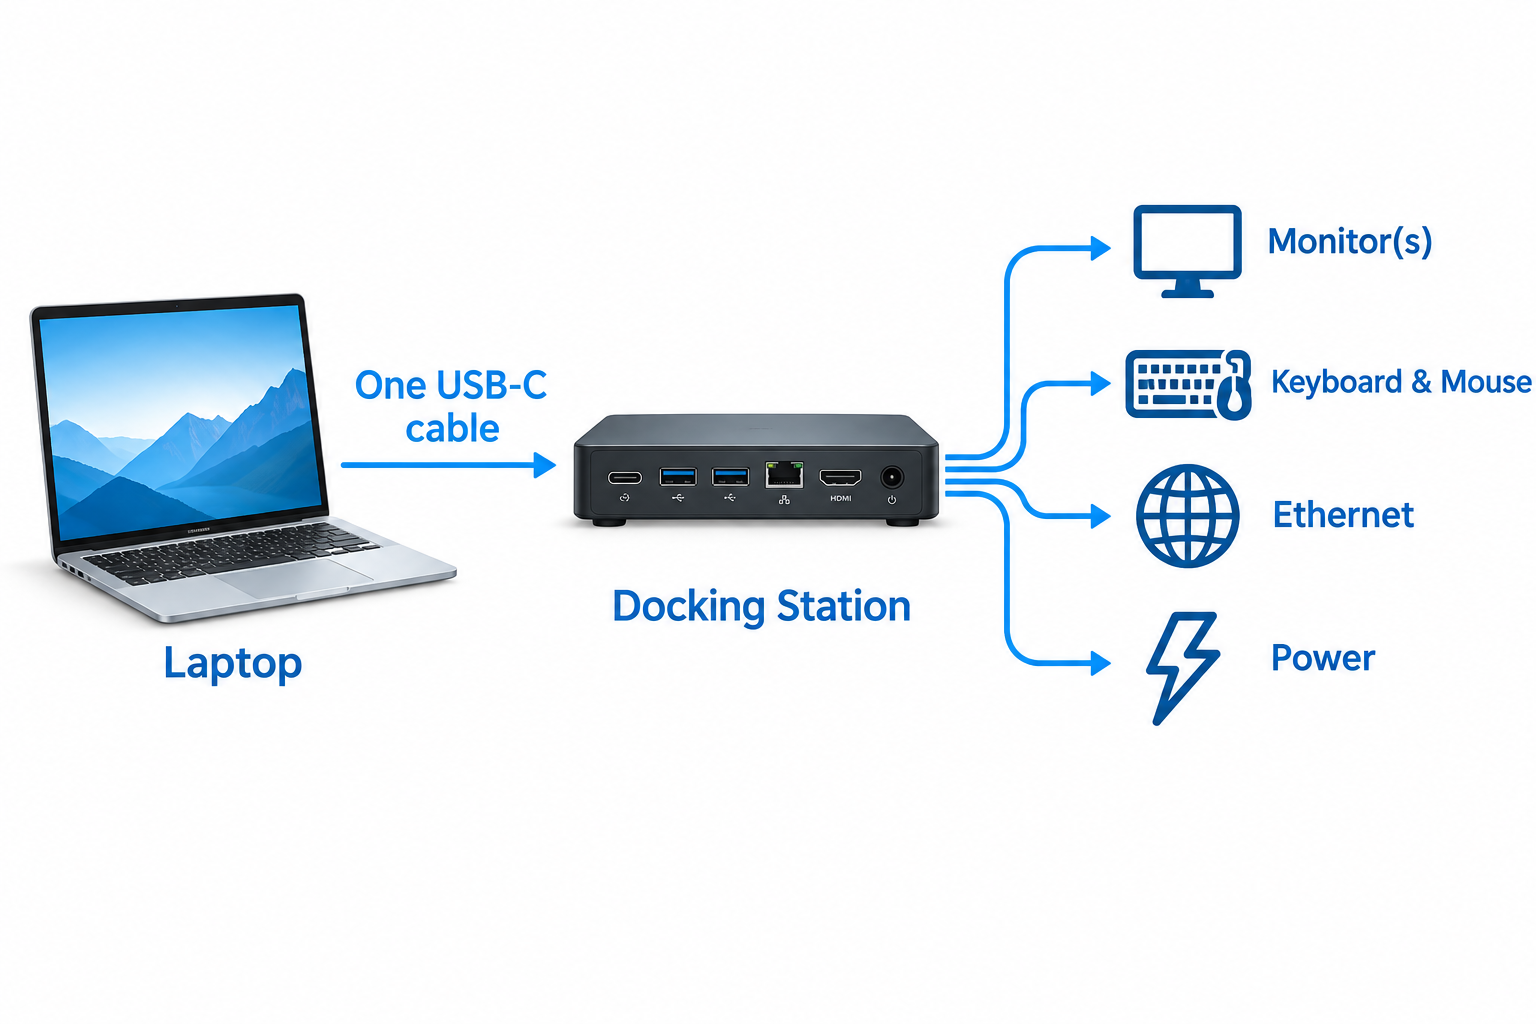
If you’ve ever sat at a standing desk in a situation where a laptop, monitor, mouse, keyboard, cell phone charger, etc., are all competing to occupy a few ports, you’re probably already familiar with the issues covered in this article. In my experience, most of the complaints from readers about the “cable arrangement problem” are not actually because there are too many cables, but because there is no space to organize them in one place. The docking station is designed to solve this problem and is one of the first upgrades I recommend after I finish setting up the Standing Desk Workspace.
When you connect your laptop to a docking station with a single USB-C or thunderbolt cable, the docking station manages all connected devices, including monitors, keyboards, mice, networks, and storage devices. However, there is one thing I want to clarify. This is because I’ve seen many docking station marketing exaggerate and promote this point. The docking station does not remove all cables on the desk. In fact, what a docking station does is to move the fixed connection from the laptop to the docking station, so the only cable you touch every day is the one that connects the laptop to the docking station.
What Does a Docking Station Do in a Standing Desk Setup?
Laptop
↓ USB-C / Thunderbolt cable
Docking Station
↓
Monitor / Keyboard / Mouse / Ethernet / Storage / Power
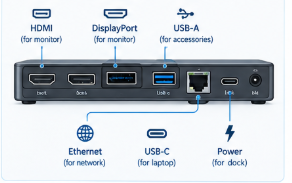
Why Put the Dock at the Center?
By permanently connecting your monitor, keyboard, and mouse to the dock, you can save yourself the trouble of unplugging and replugging enough cable to occupy half of your desk each time you sit. A single cable puts all devices into operation.
What a Dock Does and What It Doesn’t
The dock integrates a variety of connections into one place, charges laptops for some models, transmits video to one or more monitors, and adds USB and Ethernet ports. However, you cannot force an incompatible notebook to support features that are not originally designed to support. One of the mistakes I often see is that just because the port is shaped like a USB-C, I assume it will work the same as all other USB-C ports. But that’s not true. USB-C is simply in the form of a connector and does not guarantee image output, charging power, and data transmission speed.
Start With Your Laptop Before Choosing the Dock
Check the port itself: See what your laptop’s USB-C or Thunderbolt ports actually support: USB data, display output, Power Delivery, and whether it’s Thunderbolt/USB4 or a regular USB-C.
Check the monitor specifications: Carefully consider whether you want to use HDMI or DisplayPort, resolution and refresh rate, and how many monitors to connect to. If you are still adjusting the monitor placement itself, please refer to my standing desk monitor height guide for eye height and distance.
Check the power you need for your laptop: The Power Delivery Watts on the dock should not simply meet the typical minimum standards, but should match the actual power consumed by the laptop. If I could go back to the first time I started a dock review and give myself one piece of advice, this would be it. Don’t choose the product based on the number of ports. Even if you have 12 ports, if you use a dock that does not meet the power delivery specifications, you will have to connect a separate charger anyway, which overshadows the original purpose of using the dock.
Decide What You Actually Want Connected to the Dock
Essential Connectors: External monitor, keyboard, mouse, laptop, dock power.
Optional connectivity: Ethernet, webcam, external SSD, SD card, headset, speakers, secondary monitor.
Making these checks before purchasing cable organizer supplies is a minor step, but it greatly reduces the hassle later. If your keyboard and mouse layout is still a bit improvised, it’s a good idea to organize it at this stage. The Keyboard Tray Guide for the Standing Desk details the height and skew, because setting the tray height incorrectly invalidates many of the benefits of cleaning up the cables above it.
Where Should I Place the Docking Station at the Standing Desk?
This is where the standing desk is truly different from the fixed desk because the entire desk moves.
- Desk Top: The easiest to reach and the simplest to set up, but it takes up available space, especially if you’re using a compact or narrow desk.
- Behind the Monitor: While you can keep your docking station out of sight and reduce the length of your display cable, it’s often more difficult to pull out the devices you need to connect to.
- Under Your Desk: The cleanest look and fits well with your cable tray, but it’s the most inconvenient option if you need to add accessories regularly.
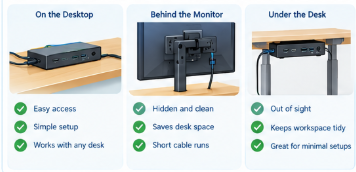
To be honest, there is no universal ‘right’ position. In the end, it depends on how often you have to touch the dock yourself and how often you just leave it alone.
Cable Management Changes When the Desk Moves
In the case of a fixed desk, the cable only needs to be able to reach the connection target. On the other hand, standing desks require cables to operate properly even when the height changes several times a day.
Three Cable Zones:
- Desk top section: monitor, keyboard, mouse, laptop.
- Redirect Area: Cable connected to a removable desk frame, monitor arm cable, dock connection cable.
- Fixed Zone: wall outlets, network connections, everything on the floor.
Leave Enough Cable Slack for Sitting and Standing
First, the test is conducted at the lowest height, and make sure there is a tight pull. Then, raise the desk to its maximum working height and look for a tight pull cable, jammed parts, connectors under excessive tension, or a multi-tab that is pulled with the desk. Keep the cables properly organized. It shouldn’t be a coil that is stretched out loud, but it shouldn’t be pulled tight like a drum.
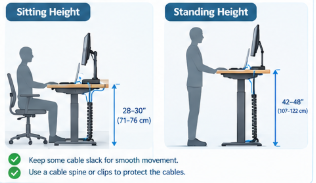
This is not just a matter of arrangement. Loosely laid cables across the floor are an obvious risk factor, and statistics support this. According to a Safety Board handout issued by the OSHA citing data from the Bureau of Labor Statistics (BLS), about 700 work-related deaths occur in the United States each year due to slips, jams, and falls, and much more non-fatal injuries occur. Securing the cable at the point where it exits the moving desk is one of the most cost-effective measures you can take to avoid being included in these statistics.
Use a Cable Tray, Spine, and Clips Together
- Cable tray under desk: Useful for organizing docks, power adapters, power strips and extra cables.
- Flexible Cable Spine: Organizes vertical cables running from a moving desk to the floor.
- Cable clips and reusable cable ties: Tie cables together without crushing or bending sharply.
This problem cannot be solved with just one product. In fact, you need to use these products in combination to keep your surroundings clean even during months of lifting and lowering your desk.
A Clean One Cable Standing Desk Layout
Laptop
↓ one USB-C/Thunderbolt cable
Docking Station
↙ ↓ ↘
Monitor | Keyboard+Mouse | Ethernet/Storage
↓
Power
Common Standing Desk Docking Station Mistakes
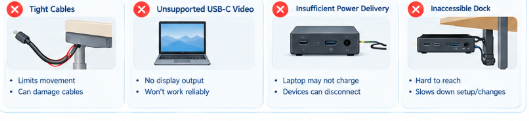
- Assume all USB-C ports support video output.
- Choosing a dock based on the number of ports.
- Connecting the cable too tightly without considering the full range of motion of the desk.
- Forget that the monitor arm also moves, so you need a separate free space.
- Keeping the dock out of reach.
- Testing only in a sitting position.
- Ignoring the actual Power Delivery specification of the poison.
Troubleshooting a Standing Desk Docking Station
Monitor is not Showing an Image?
Check whether your laptop supports video output, dock compatibility, display cable itself, input source from the monitor, and whether driver software is required for some DisplayLink-based docks.
Doesn’t Your Laptop Charge?
Check the power connection status of the dock, Power Delivery specifications, host cables, and the actual requirements of the laptop.
Does Everything Work Normally Until the Desk Goes up?
Check the cable path right away. Check to see if the cable is low on clearance, hangs, the port is under excessive tension, or the cable spine is out of place.
A Dock Should Simplify the Desk, Not Add More Clutter
If you want to set up this today then you will proceed in the following order. First, check the compatibility of your laptop, determine which devices are actually connected, place the dock at the center of the setting, and route the cable according to the moving device and the stationary device. Test the full height range before finalizing the settings. It only takes a minute, but you can prevent the mishap of belatedly discovering the cable hanging later.
Beyond simple neatness, there is also a clear health advantage in correctly switching between sitting and standing up. The National Institute of Occupational Safety and Health (NIOSH) under the U.S. Centers for Disease Control and Prevention (CDC) says in its own sit-down, stand-up, and pilot program, standing more during working hours can relieve pressure on the waist, hips, and legs and help reduce spinal pressure that builds up when sitting for a long time. This reminds us that the core of any cable plan is not simply to ‘support’ the desk, but to actually make it easier to use the standing function. Source: By CDC/NIOSH “Takes a Stand”.
After all, a great docking station configuration doesn’t just have more ports. The key is to harmonize the arrangement and movement, which is also a lesson that I constantly reflect on in all the standing desk configurations I review.

Aamir Riaz is the founder and owner of Bashufy. After years of working with uncomfortable desks and learning the importance of better posture, he shares honest standing desk reviews, buying guides, and ergonomic tips based on research and real user experiences to help readers make better choices for their home office setup.